DIY Chocolate Covered Oreos
Dessert are a great addition to any party but having them professionally made will definitely put a dent in your wallet. I recently inquired a few bakers about their prices on cake pops and chocolate covered cookies and I was surprised to find that they are running at $3.00 to $3.50 each.
Here is a step by step tutorial on how to make chocolate covered cookies that will hopefully save you a few dollars at the end of the day.
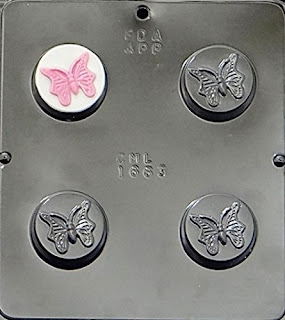
These little pretties are the next big thing. Based on your party theme you can usually find a mold online or at a baking supply store. I am planning a butterfly theme party for my daughter so I decided to go with a butterfly mold to make chocolate covered cookies. I found one on amazon for $4.99 with free shipping yay!
The first step to melt two different colors of chocolate in the microwave or a double broiler (I use Wilton Candy Melts that I purchase from Michaels).

Then pour color number one into the butterfly section of the mold. I recommend using a squeeze bottle for precision or a piping bag.


Here is a step by step tutorial on how to make chocolate covered cookies that will hopefully save you a few dollars at the end of the day.
These little pretties are the next big thing. Based on your party theme you can usually find a mold online or at a baking supply store. I am planning a butterfly theme party for my daughter so I decided to go with a butterfly mold to make chocolate covered cookies. I found one on amazon for $4.99 with free shipping yay!

The first step to melt two different colors of chocolate in the microwave or a double broiler (I use Wilton Candy Melts that I purchase from Michaels).

Then pour color number one into the butterfly section of the mold. I recommend using a squeeze bottle for precision or a piping bag.

Let the chocolate set. Then fill the mold with your second color to the halfway point and place your cookie inside. Push the cookie down and fill the rest of the mold with chocolate to cover the cookie. Tap the mold onto your countertop to remove air bubbles. You may need to smooth the top with a butter knife or silicone spatula to level it out.
Place in the refrigerator for 20 minutes to harden. Once set you can pop out the cookies and look for any edges. Use a knife to smooth out any unevenness. Now you can shout in joy because you can make chocolate covered cookies!


Check out this video on how to make chocolate covered cookies!
Comments
Post a Comment